 Newly purchased spray guns are generally coated with antiseptic oil and must be cleaned before use. Remove the nozzle and place it in a cup of thinner to clean it. This cup of thinner can be reserved for cleaning after use. When using or reusing thinner materials, you should minimize the consumption, not only reduce waste, but also prevent pollution of the environment. Carefully clean grease and metal chips from the nozzles and other parts of the threads.
 Put a half cup of warm soapy water in the paint cup and place it on the spray gun. Shake vigorously to clean the paint cup and syphon. Use a spray gun to spray soapy water and clean the inside of the gun.
Finally, use a lacquer thinner or alcohol to wash away dirt that cannot be washed off with soapy water. When using spray guns normally, it is important to wear gloves, a respirator, and operate in a well-ventilated area.
Note: An experienced painter can clean the gun with as little dilute material or solvent as possible. Whether sprayed with nitro-lacquer or water-based paint spray gun, use 1
The ounces of thinner or water can be cleaned. It is very wasteful to spray thinner material directly from the spray gun to clean the nozzle. Instead, remove the nozzle and clean it with a soft-bristle brush in the thin material. Repeat the cleaning several times and dry the paint cup and pelvic chamber.
After multiple cleanings, the thinner used for cleaning will become dirty and unusable. Remember not to pour the spent thinner directly into the sink or spill it outdoors. If there is not much used waste, the best way is to allow it to evaporate naturally, or it can be sprayed on the exhaust fan for painting to evaporate. Be careful not to let the flammable thin material's evaporating gas accumulate in the enclosed space too much, so as to avoid explosion in the event of fire.
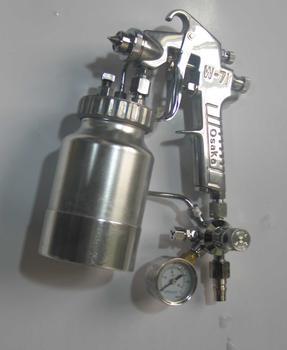
Connecting the gas line In order to connect the gun with compressed air, a suitable interface must be prepared to connect the compressed air line. A common male 1/4" metal spatula can be screwed onto the gun, taking care that dry rubber tape should be wrapped around the threads to prevent air leakage.
Commonly used compressed air hoses have an inner diameter of 5/16" or 3/8". If the hose length is within 25', a 5/16" ID hose can be used. If the length exceeds 50', it is best to use 3/8"
Inner diameter hose. The adjustment of the air pressure generally depends on the length of the hose: 15' long hoses require 30 atmospheres; 25' long hoses require 35 atmospheres; 50' long hoses require 40's
Atmospheric pressure.
The use of regulating valves The first time you use the spray gun, you can practice with water first. A half cup of clear water can be put in the paint cup. After the practice, all parts of the spray gun should be dried.
- Close fan and flow control (turn clockwise to head)
- Turn the air flow valve counterclockwise until the head opens to maximum.
Press the trigger and slowly open the flow control valve. This valve is used to control the spray gun spray paint. When the valve is unscrewed, the nozzle spray pattern should be round. If you want to spray small objects, apply polish layer or spray primer, you should close the flow control valve properly; if you want to spray a large area of ​​the plane, you can open a large valve to increase the paint flow. The flow control valve should be adjusted together with the fan control.
The sector control valve is used to adjust the pattern of the sprayed paint on the surface being sprayed. Opening the fan control valve can bias the pattern to an ellipse, and turning off can make the pattern become a perfect circle. The shape of the sprayed pattern can be flexibly adjusted as needed. If the width of the pattern is increased, the flow of paint should be increased accordingly.
- Loosen the ring on the nozzle to rotate the nozzle. This can control whether the sprayed pattern can be stretched horizontally or vertically.
The effect of different air pressures • How the spray gun cap is ejected by the spray gun • Insufficient operating temperature of the spray gun nozzle • Operating principle and maintenance measures of the electrostatic spray gun • Body repair paint finishing process • Spraying reminds you of spray gun maintenance • Double-station polisher and automatic The area of ​​the polisher...
The normal pressure range should be 1550
Between atmospheric pressures, the smaller the spray pattern, the lower the required pressure. Each painter thinks that the appropriate pressure varies, depending on his taste. Here are some typical air pressure application methods:
1520 atmospheres: Blow clean, polish, primer, gradient paint, and thinner paint.
2025 atm: Smooth coating, especially for lacquer.
3545 atm: spray sealer primer or surface paint.
50 Atmospheric Pressure: Water-based paint should reduce the pressure as much as possible, as long as the paint can be decomposed into a mist and ejected. If the sprayed pattern is not smooth enough, the pressure can be appropriately increased.
The 1.8mm nozzle on the dilution nozzle can meet the direct spray requirements for a variety of coatings without dilution, including water-based paints, sealer primers, solvents, and thinner varnish. There are many ways to dilute paint, from direct spray paint to rare ones
Dilutions of 2 parts of paint and 2 parts of paint can be tried. If thinner layers are to be sprayed or the shades are repeatedly found in paint repair, more thinner material can be added.
Before starting the dilution, spray the undiluted paint first. If there is splashing or foaming of the paint from the nozzle, the thinner material can be gradually added until the sprayed pattern is uniform and no large droplets appear. If necessary, air pressure can also be increased appropriately.
Into the paint After the paint has been stirred or shaken, pour it into the paint cup one at a time. Inverted paint bucket 1
About a minute or so, the paint was completely dripped into the paint cup. Finally, the paint bucket was used with a few fingers to make the paint on the barrel mouth drip. Used paint buckets should be covered as soon as possible to prevent the paint from disintegrating or drying out.
When spraying, the spray gun should be 58 inches from the surface being sprayed (12-20
Centimeter) press the trigger, test whether the traces sprayed on the waste are normal. The freshly sprayed lacquer should appear wet and the waterborne paint should appear to be semi-dry. The spray gun should always be perpendicular to the surface to be sprayed and moved parallel to the spray surface, maintaining a constant distance from the sprayed surface. . Spray paint movement should not be curved, so as not to uneven coverage of each spray marks. The trace of each spray should overlap with the last one-third.
The speed of the gun should be appropriate. If it is too slow, the paint will accumulate too much. If it is too fast, it will make the dried paint look very rough. The proper speed should be based on your own experience. When you find the sprayed body, you should install a long handle in the neck device slot to facilitate movement. Start spraying gradually from the end of the body and spray one side before spraying the other.
When spraying the front or back of the body, adjust the spray gun pattern to a vertical oval shape, starting from the end of the tail and painting from left to right. Each line of spray marks should overlap about one-third of the previous line, and each time the entire surface is sprayed.
The significance of the spray from the top down is that in case the sprayed paint flows down, it can be dissolved by the paint just sprayed below. When spraying paint to the vertical surface, the spray gun should move faster, preventing the paint from accumulating underflow or the local coating being too thick.
Cleaning after spraying lacquer If you need to spray paint intermittently throughout the day, you don't have to clean the spray gun every time you finish the painting job today. When it is necessary to clean the spray gun, remove the compressed air hose and the paint cup, and then press the trigger so that the paint accumulated in the spray gun flows back into the paint cup. After completing these methods, you can completely clean the spray gun as described above.
After the cleaning is completed, there is a possibility that a little thinner material remains in the paint cup, and the paint cup can be directly returned to the spray gun to be used for the next use. Do not press the trigger again after final cleaning to avoid backflow of thinner material in the gun into the paint cup. This will ensure that internal components are clean and prevent adhesion. Note that this method cannot be used with water-based paints.
Cleaning after spraying water-based paint After each spray, the water-based paint should be poured back into the paint can as soon as possible, and then the spray gun should be rinsed with water. After controlling the paint in the spray gun, add a little water to the paint cup, shake it well and spray it out of the nozzle. Wipe away any paint left on the exterior of the spray gun and place it in the sink. Clean the sink and invert the spray gun. Use a warm water to flush the siphon and let the water flow out through the nozzle. After cleaning, wipe all accessories dry or blow dry.
Coating Additives, Textile Dyes, Plastics Pigment
Dynasty Chemicals (NingBo) Co., Ltd. , http://www.dychemco.com