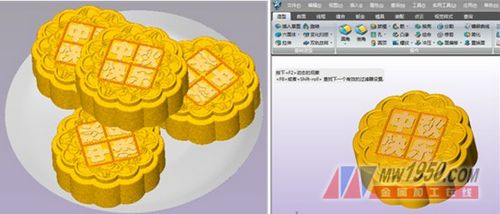
"Being alone in a foreign land is a stranger, every time the festival is full of love." The mooncakes of the delegation are the most blessed food and gifts for the Mid-Autumn Festival. This 3D CAD fun tutorial teaches you how to quickly complete the 3D CAD modeling of mooncakes in 10 minutes through the efficient 3D CAD design function of Zhongwang 3D. It is very suitable for beginners to quickly master CAD skills and send them to friends and family. Different "blessings"! Next, let's share with you how to "paint the mooncake in six steps" - the specific steps to make the 3D CAD model of the 3D brand moon cake.
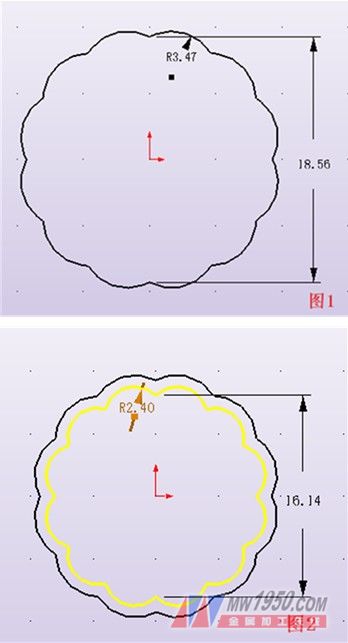
1. Create a new multi-object file named "Mid-Autumn Mooncake". Create a new part and name it "moon cake." Insert a sketch—Select the XY plane and enter sketch mode to draw a sketch 1, as shown in Figure 1. Exit the sketch. Here to remind everyone a 3D trick in the middle, here you can first create a dodecagonal, and then draw an arc on the side. Next, continue to insert the sketch - select the XY plane, draw the sketch 2, the graph shown in Figure 2 (the yellow part is the sketch 2), and exit the sketch mode.
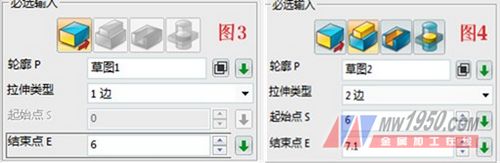
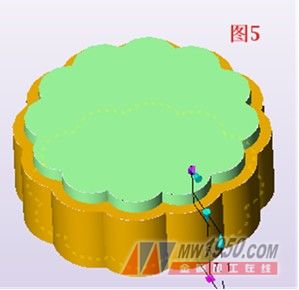
2, select the shape - stretch, outline selection sketch 1, the stretch type is 1 side, the end point is set to 6, the rest select the default option, OK, the parameters are shown in Figure 3. Then select the stretching command, the contour selection sketch 2, the stretching type is 2 sides, the starting point is 6, the ending point is 7.1, and the addition operation is performed. The parameters are as shown in Fig. 4, and the effect diagram is shown in Fig. 5.
3. Take the upper surface shown in Figure 5 as the sketch reference surface, enter the sketch mode, and draw the graph shown in Figure 6. Here, you can use the offset curve command to offset 2mm inward, the design effect will be better, exit the sketch mode. Select Model - Stretch Command, Outline Select Sketch 3, Stretch Type is 1 Side, End Point is -0.4. The draft angle is selected to be 17 degrees, and the effect is as shown in Fig. 7. However, the sides of 1, 2, 3, and 4 of the pattern shown in Fig. 7 are rounded.

4. Insert the sketch, with the upper surface of Figure 7 as the reference surface (green part of Figure 7). The effect is shown in Figure 8, and the sketch is exited. Continue the above surface as the reference surface, enter the sketch mode, and draw the graph shown in Figure 9. At this point, you can use your own creativity and make use of the efficient design features of Zhongwang 3D to create your own personality pattern.
5. Select the shape-rod sweep, select the curve drawn in Figure 9, and perform the rod sweep. The effect is shown in Figure 10. After the determination, the newly created rod shape is selected for array operation, the direction is Z axis, the number is 4, the angle is 90 degrees, and the determination is as shown in Fig. 11.
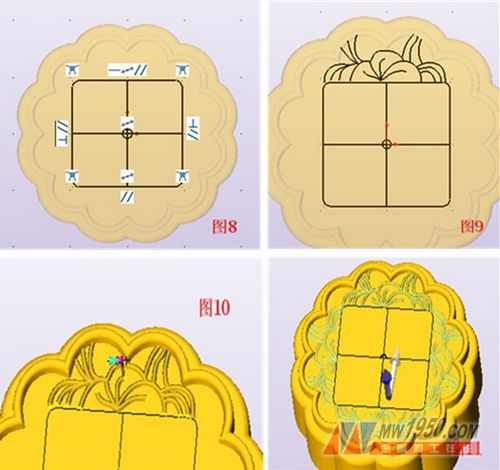
6. Select the sketch 4 shown in Fig. 8 and perform the rod sweeping operation as well. It is recommended to be thicker than the rod shape at the pattern, and the effect of the work will be more beautiful. Select the upper surface of Figure 7 as the reference surface to insert the sketch, draw the font "Happy Mid-Autumn Festival" as shown below, and exit the sketch. The effect diagram is shown in Figure 12. Select the shape-stretch, take the sketch drawn in Figure 12 as the outline, the stretch type is 1 side, the end point is 0.5, and the shape shown in Figure 13 is stretched out.
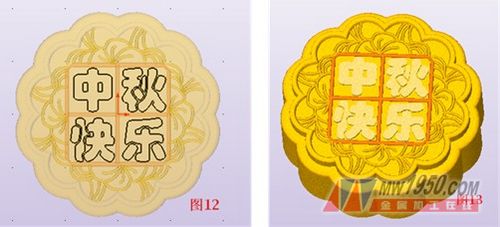
In this way, the three-dimensional CAD model of the moon cake is freshly released. The 3D CAD fun tutorial utilizes the highly efficient CAD design features of Zhongwang 3D, making the entire CAD drawing process very simple and fast. If you are not satisfied with the simple CAD modeling, you are welcome to participate in the Zhongwang technology community to collect the activities of the autumn celebration, and win the 100 gold coin exchange authorization number and other surprise gifts! For details of the activities, please see: http://

Intelligent Weighing Cabinet,Full Touch Screen Control Weighing Cabinet,10 Door Intelligent Grid Cabinet,Weighing Intelligent Cabinet
Jiangsu Xicang Intelligent Technology Co., Ltd. , https://www.xciwarehousing.com